How to Take Great Food Product Photos with a Point & Shoot Camera

posted on: April 23, 2010

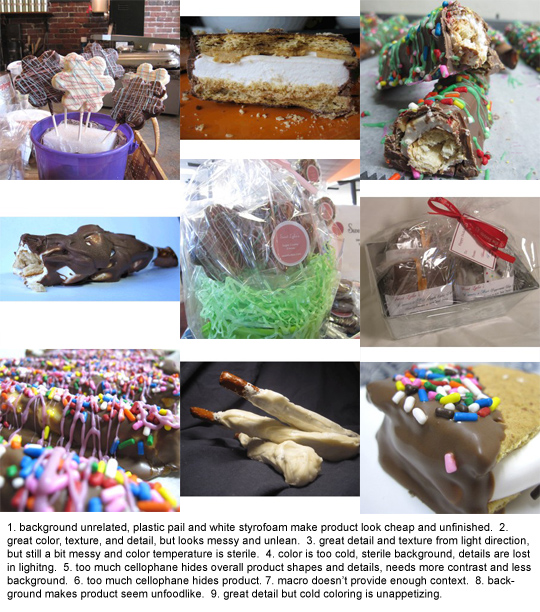
In this online marketplace, something as simple as a photo can affect the overall perception of your product's quality and value, which will ultimately make or break an online sale. Like many small businesses, Sweet Lydia's needs great photos of her products for her website. The photos need to be an accurate product representation, and they need to be desirable to her buyer. While she would love to have a professional photographer create images for her on a regular basis, she really wants to be able to create great imagery with her point & shoot camera on her own in the meantime. Since Lydia has become a dear friend, and I want her to be successful and well-represented online, I shared some tough love on her original product photography and then invited her into the studio for a mini-lesson on improving the product photos on her website. The following images were some that we were able to create with her Canon PowerShot point & shoot camera:

Sweet Lydia's Custom Smores Favors

It starts with a custom made marshmallow, sandwiched by graham crackers, cookies, or dipped onto a pretzel, and then wrapped in a blanket of chocolate. Yum! We want it to look just as fun and tasty as it sounds!

Sweet Lydias Pretzel Smores

Here are the techniques I shared to help improve her product photos:
• Create a mini scene with complementary objects to provide context for the product use & to suggest a relationship that attracts the ideal buyer. In the circumstance above, we paired a sentimental box with stamps to suggest sending a food gift to someone sentimental far away. In the second photo, we used a small basket and a fresh cut flower with mason jar to suggest taking some along for a picnic.

• Use soft natural light, preferably in open shade but close to an open light source like a window or door. The images above were taking in a hallway next to a large window of light in the afternoon.

• Use complementary colors to make products stand out rather than blend in. We used greens to help offset the pinks in the first image and then the pink flower in the second image to provide contrast to the brown, but also to create a relationship with the sprinkles.

• White balance for a warmer tone when photographing food (on a point & shoot camera, this often involves changing the "AWB" to Shade or Sun). Warm colors make food look healthy and nutritious. Blue tones make it look moldy or old.

• Step back and zoom in to provide accurate object size comparisons and to compress background scenery to a minimum. Zooming in helps narrow your background so that you don't have as much competition for attention in your product scene.

• Make adjustments in Photoshop or iPhoto, or whatever program you have, to enhance brightness and contrast for a little extra detail and clarity. Extra contrast helps provide sharpness and clarity, as long as it isn't taken too far, which could result in something looking fake. Brightness will help bring out details and textures.

While I know we can create more amazing images with studio lighting and/or professional cameras and lenses, it's not always practical for today's crafters and entrepreneurs who are working with limited budgets and time. A basic photographic understanding of how to make a product look more appealing can really make a difference in online sales, which hopefully translates into more people making a living doing what they love, which ends up creating a greater sense of peace and happiness in the world! ("Some say I'm a dreamer, but I'm not the only one.")

How to Take Amazing Engagement & Wedding Ring Photos

posted on: October 14, 2009

How To Photograph Rings-03.jpg

It's been almost a year since I first wrote this post and a whole new season of just engaged couples are appearing on the scene, so I thought I'd bring this post back to life for all of the 2010 brides to be! (I know you're dying to see some of my newest work, but I'm still crazy busy and blogging is a low priority right now!!)

I received a great question from a bride in the comments over on WeddingbeePRO and I thought I'd turn this into an extended post for everyone out there who's working with a point & shoot camera and looking to get a great shot of their engagement or wedding ring to share with friends and family!! (For this post, I'll be using my own point & shoot camera, the Canon PowerShot SD870IS Elph.)

How To Photograph Rings-06.jpg

1. Take Off Your Ring
As beautiful as your latest manicure may (or may not) be, it's going to be so much easier to take a great picture of all of your ring's beautiful details when it's off your hand (especially if there's side detailing). After this post, I hope to inspire brides to show off their rings in style and with creativity and personality! It could even become your facebook announcement or twitter avatar, since everyone is going to ask to see it anyway! So get the ring off the finger and get creative! (Can I just tell you how hard it is to squeeze my ring off of my fingers these days?! OUCH!!)

2. Find a Cool Background or Set Up
To make your ring shot "artistic" find something really interesting or different - I like things that represent you and what you love! Maybe it's a cool band poster, or the first love letter or card you received from your sweetie, or your favorite book, or your favorite fruit (oooh.. I wish I had a kiwi in my house right now- that would be mine!), or your favorite flower, or your favorite pair of shoes, or just a cool texture like an awesome sweater or pillow you have laying around - whatever! ANYTHING can make a great background. Get creative! If you need inspiration, definitely check out the Rocktographers Blog.

How To Photograph Rings-01.jpg

3. Find Good Light
Good light is ESSENTIAL to a great photograph! The easiest light to work with is natural light because it's the most powerful and consistent. Make your way to a nearby window or take it outside. If you don't have any natural light to work with, you can get creative with a flash light, the light coming from your computer or TV, or just any ol' light in the ceiling or from a lamp around your house. BUT, in order for artificial light to be bright enough, you may need to get very close to the light source, which is why a flashlight may sometimes work better in these situations.

Why shouldn't you use the flash on your camera?! Because the reflection from your ring may blind the camera's exposure meter and cause a pretty crappy picture. It's kind of like when you get pictures with red-eye. With most point & shoot cameras the flash is entering the eye at the same angle it's leaving the eye - reflecting off of the red and veiny retina at the back of the eyeball. Gross, right? Yeah, use another source of light that's not the point & shoot flash. Which also might mean manually turning off your flash so that it doesn't automatically fire- you may need to read your camera manual if you haven't already figured out how to do this.

4. Set it up
Think about the prettiest view of your ring - is it the setting from the top? The amazing details on the side? Think about the angle you'll be photographing your ring in terms of how your photo will best highlight what you love about your ring. If you need help standing your ring up, find something you can stick it into, or if you need to, a glue dot or a little tape might help keep it upright if that's how you want to shoot it. There's no shame in this game - just play around with it until you like how your entire set-up looks with your creative background. If you're anything like me and you never take your ring off, this would be a good time to give it a good toothbrush scrubbing to get rid of any soap scum (unless the metal in your ring is too soft for that kind of treatment- but most will be fine.)

How To Photograph Rings-02.jpg

5. Set Your Camera to Macro Mode
Most point & shoot cameras have a macro mode. It's usually represented by a little flower or tulip. This allows your camera to focus at a much closer range than would normally be possible. In macro mode, you should be able to get a close up shot in sharp focus even if you're only 1-4 inches away. If for some reason you have a not-so-great point & shoot and it doesn't have macro mode, try zooming in from further away to get a great detail shot. iPhones and camera phones will simply NOT work for a great ring shot.

How To Photograph Rings-05.jpg

6. Get Closer
For the best ring shot, your ring should be no less than half the size of the screen, unless you're giving your background equal or greater billing in this photo. It's totally possible to fill your screen with your ring when you're in macro mode or zooming in. Just make that ring take up as much of the screen space as it can on that beautiful LCD.

7. Just Shoot It
When you're in macro mode, or zooming in tight, it is essential that you stay completely still for this photo because any little movement will pull it out of focus. Either brace your arms on something or use some thing else to balance your camera on, like a tripod, stack of books, upside down bowl, whatever- just keep that camera STILL if you want to get all of the details in focus. If you need to stand over your ring, pull your arms in tight to your body so they'll be less likely to move around as you're taking the photo.

Once you're all set to shoot your amazing ring on your creative background- shoot the heck out of it! Try shooting it in different ways, try moving the camera around for a different angle or perspective, try framing the ring differently on the screen, try moving the light around, or positing it so that the light hits it differently, take multiple shots of the same set up because one might be blurry and the next one might be in focus! Rings are especially difficult because they're often metal, which is reflective, and can fool the camera's focus point into thinking it's further away than it really is. With point & shoot cameras there are a lot of things you can't control very easily - like the exposure and point of focus, so it's good to take a LOT of different pictures and then look at them all later on your computer screen before deciding which one is "THE ONE". It's all digital baby, so don't be afraid to take tons of pictures- the goal is to get ONE amazing photo in the end, but it might take 30 or more shots to get that one amazing photo. Work it out!! (Um, yeah, I worked it out like 90 times. I may be just a BIT of an obsessive perfectionist! I'll probably end up editing this entire post like 20 different times too. Whatever- make it rock or don't do it all!)

How to Take Ring Photos

8. Edit
After you've shot a bazillion photos of your ring, load them to your computer to view them at full screen size in order to make your selection rather than trying to choose one from the tiny screen on the back of your camera. You'll get a much better look at the clarity and focus as well as the colors and exposure when you're looking at the images on your computer screen. Force yourself to narrow it down to just one or two photos. As a professional, this can sometimes be the hardest part of my job, especially when there are tons of awesome images that essentially look exactly the same. But frankly - no one wants to see a bazillion photos of your engagement or wedding ring, they just want to see one or two shots with great detail to show off the overall design.

If you've done everything right up to this point, you should be done! If you want to get crazy with photoshop at this point, go for it, but remember to keep it about the ring itself and not about a bunch of crazy after-effects which will might just take away from the beauty and design of that awesome ring you love so much!!

9. Share it with the World!
Here are my results with my point & shoot camera... not as great as what I can do with my professional lenses, but hey, I worked what I got and you can too!! (Complete with five years of wear and tear on platinum and white gold - it's been a good ride so far!!) I'd love to see what you come up with!! Share your link in the comments and show us what you did!!

How To Photograph Rings-04.jpg
Gorgeous custom egg was a 5th anniversary gift from my husband, custom designed and created by our dear friend Liz Smith, who's an indie craft artist. You can find more of her fun creations in her etsy shop--> Made in Lowell, or if you live in the Boston area, you can see her work in person and maybe even get a live demonstration of her techniques at Western Avenue Studios, where you can visit my studio as well!

Some insider gossip for you... my engagement ring is actually a big fat one carat Ziamond. Yep, CZ baby. Alex and I were students when we got engaged and when we started looking at rings, I told him, "you don't need to buy me a diamond because it's not about the rock, it's about the symbolism of commitment." He really didn't believe me at first, and I reassured him that, "after we've been married for like 10 years, and our commitment really means something, then we can upgrade if we have the money, but until then I don't want money to prevent us from making this commitment to each other." What's sad is that the jewelry stores gave him a really hard time for asking for a CZ instead of a diamond for my engagement ring!! They kept asking, "Are you SURE she's OK with it?", and he started feeling really guilty! Seriously- just let the guy do what's right for him. One day I'd love to design a custom wedding ring and maybe even get a much more unique set of stones in the color green. In any case, we didn't put a ton of unique thought or design into our engagement or wedding rings because they were just a symbol for us, not a statement. Eventually, though, I'd love to make it a statement... a unique and subtle statement of our marriage and how we've grown together over the years. ;-) If you're reading this Alex, I love you - and if you want to upgrade your ring someday with cool enamel, different stones, or even some kind of ultra techie microchip, I'm all for it honey!! XOXOX

Wedding: Chantel & Paul

posted on: January 19, 2007


Chantel & Paul blew me away with how much of this wedding they did on their own! How they managed to do it all without being completely stressed out, mystifies me. I think I'll only be able to scratch the surface, but I tried to capture images of as much as I could. They were married at the beautiful and quaint Spring Arbor Free Methodist Church in Spring Arbor, MI.


The flower girls were simply adorable, even when they weren't at their happiest.


Chantel & Paul decided to see each other before the ceremony in order to get all of the posed images out of the way. They had a LOT of guests attending (300+?) and didn't want to make people wait after the ceremony too long before eating. I love that grooms get a chance to express themselves when they see the bride privately... maybe they feel more comfortable without everyone watching them. (Or maybe I'm just totally biased and would love it if everyone did this!!)


After we did the typical family portraits indoors, we headed outside for some more interesting shots with the bridal party and just the bride & groom. As we were walking, I heard this *chink*chink*chink*chink* and couldn't figure out what it was until I noticed that one of the groomsmen had spurs on. Later on he ditched the spurs and donned a cowboy hat instead. Niiiiiiiice.


Just in case there were any doubt that we were on the Spring Arbor campus, here's the landmark of proof!


I think the best moments happen when people think I'm done taking a picture! HA- these girls were so fun! Aren't their eyes gorgeous too?!


So, there are a lot of DIY brides out there who make their own invitations, arrange their own flowers, and maybe even make their own cake, but have you ever heard of someone growing and entire plot of sunflowers in the HOPE that they will bloom for their wedding day!? Well, that's what Chantel & Paul did. They planted their own seeds and grew their own little sunflower field. I'm still in awe.


The ceremony was beautiful, and very moving...

(some people are against taking pictures during prayer... if this is the case for you, please let me know in advance... otherwise, I see it as an opportunity for emotional moments like the one above)


One of the things that was really important to Chantel & Paul was a group picture of all 300 something guests. So, right after the ceremony, I BOLTED up to the sound booth in the balcony to get set for the huge group shot. We worked it out with the minister in advance that after the bridal party made their exit, he would ask the guests to remain in the sanctuary and move toward the center aisle for an entire group shot to be captured from the back of the church. I had the bridal party walk back in and stand in front of everyone so they were the most visible. This church had a nearly perfect set-up for this shot, especially with the wide open row in the middle! I took a few lighting test shots while everyone was getting into place, and then fired two rounds of continuous mode shots (just in case of blinks). I'm really impressed with the results- especially considering this entire room was illuminated with just one little on-camera flash with a lightsphere attached!!!

(click here to see what it looked like without the flash)

Note to all men: at some point you will need to hold a woman's purse. This may also be a cautionary reason why you might want to take an interest in the purses your girlfriend or wife may be purchasing... "Honey, should I go for the quilted pink paisley or the black leather?" Obviously this man chose to NOT offer his opinion... he he he... doesn't he sport it well though? I have to give him props for pimping it like it's his own man-bag!


Back to the DIY stuff... so, on top of GROWING their own sunflowers, they also SMOKED their own brisket!! I think they said they were smoking it the entire day before the wedding! With enough to feed 300+ people?! Wow. I'm not sure if the strawberry topping was homemade, but I loved that they had it to serve on top of the cake slices!! Too bad I didn't get to try any! It sure did look good though!!


I think the best man gave more of a Roast than a Toast! He told some great stories and had everyone rolling with laughter!


The first dance... with a little audience...


I think Paul will make a great daddy... just look at him with those girls! I think I know who he learned it from too...


When you know a lot of kids will be attending, you have to find things to keep them occupied. Dancing is one thing (if you don't mind playing a lot of songs that kids can participate in), coloring books are another (which Chantel & Paul had), or you can just pick a place like the Marshall Activity Center that has its own arcade!! How fun is that? However, it still couldn't keep one kid from getting caught red-handed in the cherry tomatoes!!! The look of guilt here just cracks me up!


There's always one guy who loves to steal the show on the dancefloor... and this was that guy!!


Name that tune!


I think it's someone's bedtime...


If you actually read all of this, CONGRATULATIONS (you must really like me)! Please take a moment to leave a comment about which image is YOUR favorite (and if you say why, that's fun to read too!) Chantel & Paul will receive a free gift enlargement (8x12) of the top pick!! (and if they don't like it, they can give it to someone who will!) The winner will be chosen next Friday- which means you have one week to vote and to get everyone you know to vote for your favorite! I can't wait to see how this turns out!!!

4 Great Wedding Resources Online

posted on: January 15, 2007

Even though I'm no longer a bride, I still keep my eyes and ears open for great wedding resources to help my brides out. There are some awesome online tools out there that I only wish were available when we were in the midst of wedding planning!! Here are some of my personal favorites:

eWedding
Wedding websites are a great way to keep your guests, family, and wedding party up to date on your wedding plans, and to fill everyone in on the FAQ of how you met, your engagement, honeymoon plans, etc. There are a lot of options for you to host a wedding website, and many of them are tied to a wedding planning website, but they all end up looking the same and they are often searchable by anyone who knows your name and wants to learn your wedding details. Great for family- bad for your fiancé's jealous exgirlfriend. The really awesome thing about eWedding.com is that not only do you get a website that looks different and is fun to update, but you can have your very own, easy-to-remember URL. No more asking people to type in a long address that they couldn't remember if you didn't send it to them in an email, just a short and concise link for your wedding guests. I was first introduced to eWeddings by Megan, who created an awesome site for her wedding, called Sweetness Follows. She's even continued to update it after the wedding with pictures and extra links, which is also a great way to let your friends and family know your new address if/when you move after the wedding!

Wedding Mapper
I would have looooooooved to have a tool like this when I was planning our wedding! We had lots of out-of-town guests and our hotel, rehearsal dinner, ceremony site, cocktail site, and reception site were all over the city! WeddingMapper.com is awesome because it allows you to add photos, icons, and descriptions about each location, and it uses google maps and satallite images of the city! How awesome is that?! The best part? It's free. I still can't believe it's free. You can add your own attraction and entertainment listings, favorite restaurants, and airports. It's printable, it's emailable, and there's even an alternative view that prints out like a mini program! Seriously, if you haven't seen this site, you need to check it out! See how one couple is using it for their wedding.

Nashville Wraps
Whatever your needs are for gift giving and gift packaging, do yourself a favor and check out NashvilleWraps.com before going anywhere else. Not only do they have an awesome selection of bags, boxes, stickers, and pouches, but the prices are VERY reasonable and some orders can be placed in small quantities. If you're really into personalization, they can do that as well, and you're sure to find beautiful, fun, and fashionable colors with lots of different packaging options (including houndstooth and leopard print!!) Seeing some of these boxes makes me want to buy things just to put in the boxes to give to people!!! Of course you could also decide to put nothing in them and instead use them for something totally different, like making a card box! They even have my signature chartreuse green - do you know how hard it is to find that as a standard option?!

Wedding Podcast Network
Wow, talk about wedding planning resources! The WeddingPodcastNetwork.com is dedicated to adding regular blog and podcast content on various wedding topics. The website is broken up into several different content areas:
Newlywedcast interviews couples who were recently married, and shares their love stories and wedding experiences. Meet the Masters interviews prominent wedding industry professionals like Darcy Miller, Editor of Martha Stewart Weddings; and Preston Bailey, Famous Floral Designer. There are many more podcast topics on the site including relationship advice, and workout tips. Why not make your own wedding podcast!?

Do you have any great resources you'd like to share?? Is there a wedding website that every bride should know about?? If so, leave a comment about it!! I'm always looking for more!

New Look!!

posted on: October 5, 2006


I'm pretty sure I have a lot of readers who just visit my blog and not my website anymore... and who could blame you? I cringed every time I looked at it, and I've wanted to change it FOREVER!!! Websites are supposed to be the first impression for potential clients and I can only imagine what people thought when they first saw it - I was actually embarrassed when other photographers would refer clients to my website to see my work! I know what I think of crappy websites when I first see them, and often times it's really hard to see how amazing pictures are when there's an ugly design getting in the way! With the same token, a really great web design can give off an amazing first impression and make an average photographer, look pretty spectacular.

First I was waiting on a friend who was going to help me out with a new site design in exchange for sharing my mad photography skillz, but he has since disappeared into the Bermuda Triangle. After waiting so long with an anti-climactic outcome, I went to purchase a new website from a flash designer, but after several calls and emails, I was never called back. So, here I am fed up with my "ghetto website" (as my brother-in-law called it) and too impatient to wait for another designer, so I decided to attempt my own design. What you see above, and now on www.anneruthmann.com is what I was able to whip together with zero dollars and not much time to spare. Yay for iWeb and .Mac! Finally I don't feel incredibly ashamed to send people to my website!! I still have plans for a bigger and better site, but I may keep this little baby as an html backup site. In any case, please leave a comment and let me know what you think!! Is it fugly? Is it cool? Does function and look good in your browser?! Oh yeah... and while you're at it... what do you think of the new branding?

Candice & Joe's Wedding

posted on: September 19, 2006


I am so crazy about this couple and their wedding!! Candice & Joe were totally unconventional, which made everything incredibly personal and special. They wanted completely candid photography with only one large group pose, giving me creative freedom to be in the moment and capture all of the little details that made their day unique. I could barely contain myself with all of the fun and unique details!! Candice's veil, dress, shrug, bridesmaid dresses, and I think even the groomsmen's vests were made by Candice's mom! Talk about a superwoman!!


How adorable are these little guys waiting for the ceremony to begin??


I really love outdoor ceremonies. There's always a risk, and it's good to have a back-up plan, but 85% of the time it totally works out and looks absolutely beautiful!!


No cake here!!! Just yummy, yummy desserts and the best beer in the entire world, made right in Michigan. ;-)


Candice & Joe had a great group of friends who loved practical jokes, and not so practical ones! Apparently Candice & Joe were both in quiz bowl together and wickedly good, so their friends put them to the test complete with REAL quizbowl buzzers and lights!!! I won't say who won this round.... but someone needs to work on their spelling! ;-) Apparently, a little bird in one of the centerpieces was subjected to a bit of friendly wrath as well... luckily they used electronic tea lights to subdue any pyromania tendencies.


I have way too many favorites when it comes to dancing pictures. You'll just have to click on an image to watch the slideshow and see more of them!! AND, you'll get to hear Candice & Joe's awesome selection for a first dance song!!


I love, love, love, love, LOVE photographing in the dark with available light. There's just a romantic and fantastical quality about images captured in this way. I'm so grateful that I was the one Candice & Joe picked to be their wedding photographer. They are just amazing people and I know that there are many years of bliss ahead of them!!


Popular Posts

Ask Anne All rights reserved © Blog Milk Powered by Blogger