Spring; so beautiful, yet so fleeting. Trees blossom with dainty soft flowers, only to shed their petals and quickly make way for leaves and berries that house and feed the birds of summer. I wanted to capture this fleeting moment, specifically, the moment in which the petals take flight from the trees. It's really a moment better communicated by video, since the motion of the petals is what's most beautiful, but as a still photographer, I wanted to push myself to explore communicating that sense of flight through still imagery. What follows is my process of exploration and discovery, which is how I approach almost anything I photograph...
I started with a basic observation of the petals leaving the trees, and I observed that the petals in the air are very difficult to see when set against the background of the tree.
Then I turned my attention to documenting the aftermath, the destination point of the petals and how the wind seems to gather them into clusters near curbs and walls, yet this still did not demonstrate the motion and the fleeting moment.
Still unsatisfied, I thought, perhaps using a shallow depth of field would sufficiently separate the tree and its fleeting petals from the background, but was unsatisfied with the minimal petals that I was able to capture. In person, I felt surrounded by petals floating in the air.
Perhaps a darker background, to offset the light color of the petals, set against the texture of the rippling canal, could do this petal shower justice?
Or maybe the sidewalks, all lined with gathered petals, would be better?
Ultimately, I settled on capturing only the petals in manual focus, with a telephoto lens, with an aperture just large enough to capture several petals while still keeping the background out of focus, and framed to create a feeling that they were free floating with seemingly no attachment to their former host.
After feeling as though I did my best to capture a still photograph of a fleeting moment, I passed a spider, troubled that all of the petals were revealing its invisible trap. Not everyone appreciates this beautiful wonder of spring.
Even after I left the scene, I continued to think about how I could capture that moment, that feeling, in a still photograph, and one more idea came to mind... I could have tried to move with the petals, at a tight aperture and a slow shutter, with a background with just enough contrast and shape to show the background in motion while keeping the petals in focus.
I'd love to hear from you! How would you approach a moment like this?
April 29, 2010
April 28, 2010
Boudoir Workshop - May 25th & 26th, 2010
May 25th & 26th in San Diego, CA I'll be sharing lighting, posing, and marketing resources for my Film Noir Boudoir & Pin Up Photography. There are great photographers on board sharing their tips, all with pretty different styles, so I'm looking forward to their presentations too!
Full disclosure: I'm not receiving any financial compensation to teach this workshop or to publicize it, however Pictage is covering my travel costs. I'm looking forward to being an attendee as much as I'm looking forward to teaching! I just love workshops!
April 27, 2010
Free To Be
We started these engagement photos right on Boston's famous Freedom Trail. Like any other major city with an active downtown area, there are people everywhere. Now, I'm pretty awesome at making a crowded place look like there are only two people there, but when the local characters actually add something a little more interesting to the shot, well.. sometimes I can't resist.
April 26, 2010
You Look So Familiar
They walked into my studio yesterday and there was this light surrounding them. A familiarity, as if I needed to know something more, as if a story needed to be told. I almost asked them if they wanted to hang out sometime, but stopped just short, thinking how it might be a little weird since we had only just met. Then they appeared again, in my living room, as my husband started up an AppleTV slideshow of my Flickr stream set to his Pandora stream. I wasn't really paying attention, since I've seen the images many times, but I happened to glance up and see the image below, and it was too serendipitous to ignore. When I originally photographed the image last year, all I saw was a generous smile and a perfect moment, but now for it to appear again just after seeing them in my studio- I had to say something.
I have this general rule in my life: twice is coincidence, thrice is significance. So, maybe this blog post will mean something to someone, maybe it won't, but I feel better knowing I put it out there.
April 25, 2010
April 24, 2010
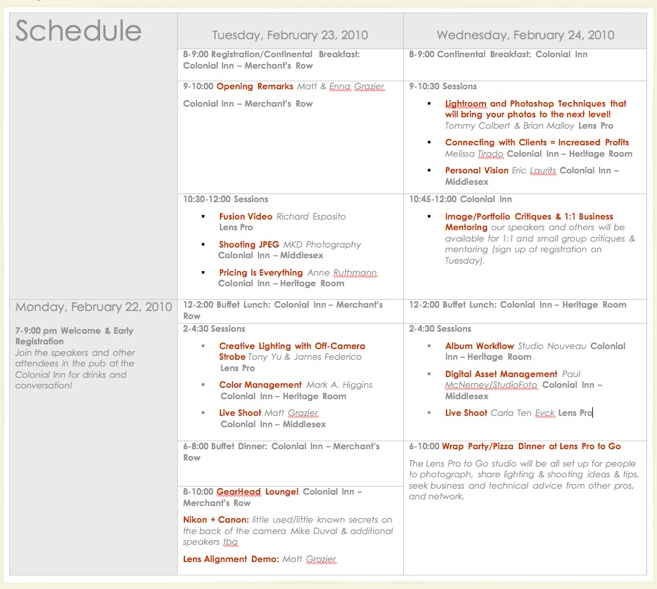
Inspire Boston 2010
In February I had the pleasure of teaching and mentoring as part of the Inspire Boston Workshop & Retreat for Photographers.
What I loved about this particular workshop was that most of it took place in Concord's Historic Colonial Inn, which provided a cozy atmosphere and gathering place for all of the photographers involved.
Of course, it was also great that we had nearby access to all of the photography amenities at Lens Pro To Go.
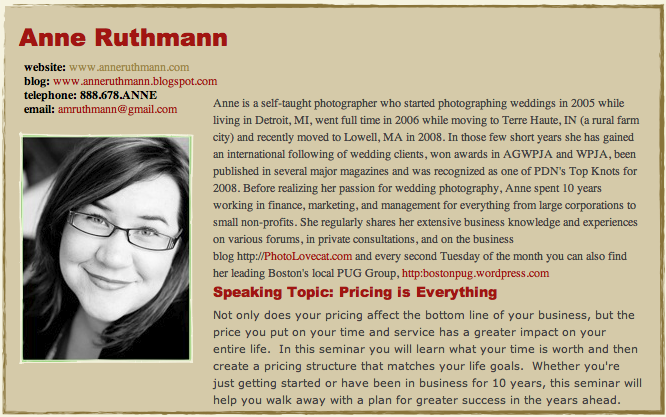
The classes were intimate, rich with content, and there was plenty of time for mingling and mentoring in-between sessions- which I find to be a critical piece in a retreat-style workshop. My presentation was a reverse thinking way of approaching pricing, which was designed to really make people define what they want out of being self-employed. I always feel like I need a couple days to really get detailed on any one subject, especially when I'm speaking to a large group of people who have different needs and are at different places in their business. Which is exactly why I loved being a mentor as part of the retreat. Even though it was only supposed to be 30-45 minutes with each person, I often ended up mentoring for more like 90 minutes just because I really wanted to help each person and not just skim the surface. I just love helping people, and I feel like we can accomplish so much more when it's one on one.
Special thanks to The Graziers who really put the bulk of the effort into making Inspire Boston happen. I know it's been a dream of theirs for quite some time.
April 23, 2010
How to Take Great Food Product Photos with a Point & Shoot Camera
In this online marketplace, something as simple as a photo can affect the overall perception of your product's quality and value, which will ultimately make or break an online sale. Like many small businesses, Sweet Lydia's needs great photos of her products for her website. The photos need to be an accurate product representation, and they need to be desirable to her buyer. While she would love to have a professional photographer create images for her on a regular basis, she really wants to be able to create great imagery with her point & shoot camera on her own in the meantime. Since Lydia has become a dear friend, and I want her to be successful and well-represented online, I shared some tough love on her original product photography and then invited her into the studio for a mini-lesson on improving the product photos on her website. The following images were some that we were able to create with her Canon PowerShot point & shoot camera:
It starts with a custom made marshmallow, sandwiched by graham crackers, cookies, or dipped onto a pretzel, and then wrapped in a blanket of chocolate. Yum! We want it to look just as fun and tasty as it sounds!
Here are the techniques I shared to help improve her product photos:
While I know we can create more amazing images with studio lighting and/or professional cameras and lenses, it's not always practical for today's crafters and entrepreneurs who are working with limited budgets and time. A basic photographic understanding of how to make a product look more appealing can really make a difference in online sales, which hopefully translates into more people making a living doing what they love, which ends up creating a greater sense of peace and happiness in the world! ("Some say I'm a dreamer, but I'm not the only one.")
It starts with a custom made marshmallow, sandwiched by graham crackers, cookies, or dipped onto a pretzel, and then wrapped in a blanket of chocolate. Yum! We want it to look just as fun and tasty as it sounds!
Here are the techniques I shared to help improve her product photos:
• Create a mini scene with complementary objects to provide context for the product use & to suggest a relationship that attracts the ideal buyer. In the circumstance above, we paired a sentimental box with stamps to suggest sending a food gift to someone sentimental far away. In the second photo, we used a small basket and a fresh cut flower with mason jar to suggest taking some along for a picnic.
• Use soft natural light, preferably in open shade but close to an open light source like a window or door. The images above were taking in a hallway next to a large window of light in the afternoon.
• Use complementary colors to make products stand out rather than blend in. We used greens to help offset the pinks in the first image and then the pink flower in the second image to provide contrast to the brown, but also to create a relationship with the sprinkles.
• White balance for a warmer tone when photographing food (on a point & shoot camera, this often involves changing the "AWB" to Shade or Sun). Warm colors make food look healthy and nutritious. Blue tones make it look moldy or old.
• Step back and zoom in to provide accurate object size comparisons and to compress background scenery to a minimum. Zooming in helps narrow your background so that you don't have as much competition for attention in your product scene.
• Make adjustments in Photoshop or iPhoto, or whatever program you have, to enhance brightness and contrast for a little extra detail and clarity. Extra contrast helps provide sharpness and clarity, as long as it isn't taken too far, which could result in something looking fake. Brightness will help bring out details and textures.
While I know we can create more amazing images with studio lighting and/or professional cameras and lenses, it's not always practical for today's crafters and entrepreneurs who are working with limited budgets and time. A basic photographic understanding of how to make a product look more appealing can really make a difference in online sales, which hopefully translates into more people making a living doing what they love, which ends up creating a greater sense of peace and happiness in the world! ("Some say I'm a dreamer, but I'm not the only one.")
April 14, 2010
Featured on Boston Channel 5 Chronicle!
Tonight at 7:30pm, The Boston Channel 5 Chronicle is doing a feature on local Art Colonies and I'm very proud to say that Western Ave Studios will be featured as part of the program! I was out running on assignment most of the day they were filming, so you won't see me personally anywhere in the program, but you will get a taste of the wonderful artist community I work in every day!! It's just another great reason why you should come and visit my studio! ;-)
Clicking the image below will take you to the video preview of the program:
April 13, 2010
April Desktop - Spring is here!
In just the last week, the trees and bushes have come alive with color and gorgeous blossoms in the Merrimack Valley. I absolutely love living in the Northeast! I spent Sunday morning just exploring and appreciating all of the beauty that has emerged from our winter full of heavy and snow and rain. These two images were taken specifically for my desktop series, so go ahead and click the images to download a copy for yourself!